Galaxy workflows with EC3
| Overview | For users | For resource providers | Infrastructure status | Site-specific configuration | Architecture |
Galaxy workflows with EC3
Introduction
This guide is intended for researchers who want to use Galaxy, an open web-based platform for data-intensive research, in the cloud-based resources provided by EGI.
Thanks to the EC3 portal, researchers, from the Life Sciences domain, will be able to rely on the EGI Cloud Compute service to scale up to larger simulations without worried about the complexity of the underlying Infrastructure.
This how-to has been tested in the EGI Access Platform. The only pre-requisite to use the Galaxy web-portal is to be a member of this infrastructure.
Objectives
In this guide we will show how to:
- Deploy an elastic cluster of VMs in the cloud resource of the EGI Federation
- Install a Galaxy web-based platform for data intensive research with a Torque Server as backend
- Install custom Galaxy tool (booties2)
The EC3 architecture
The Elastic Cloud Computing Cluster (EC3) is a framework to create elastic virtual clusters on top of Infrastructure as a Service (IaaS) providers is composed by the following components:
- EC3 as a Service (EC3aaS)
For further details about the architecture of the EC3 service, please refer to the official documentation.
Create Galaxy workflow with EC3
Galaxy, a web-based platform for data-intensive research, is one of the applications available in the EGI Science Applications on-demand Infrastructure.
This Infrastructure is accessible through this portal and offers grid, cloud and application services from across the EGI community for individual researchers and small research teams.
Configure and deploy the cluster
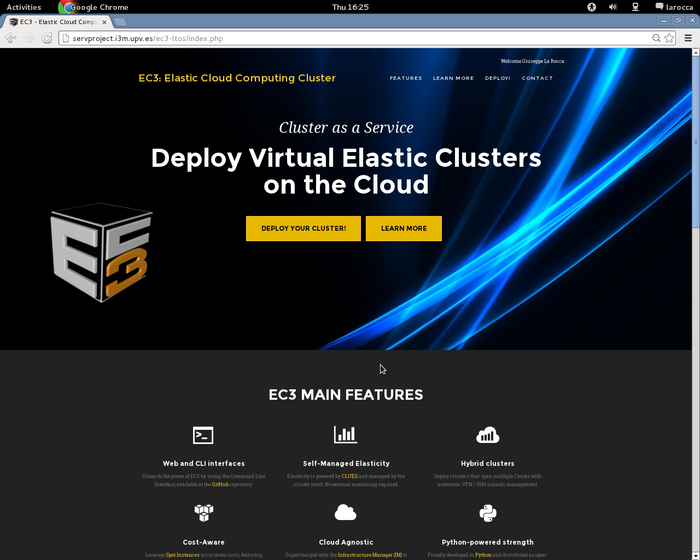
To configure and deploy a Virtual Elastic Cluster using EC3aaS, a user accesses the front page and clicks on the "Deploy your cluster!" link as shown in figure:
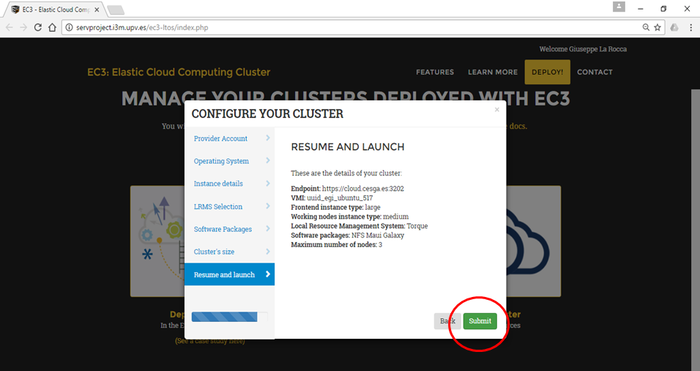
A wizard will guide the user during the configuration process of the cluster, allowing to configure details like the operating system, the characteristics of the nodes, the maximum number of nodes of the cluster or the pre-installed software packages.
Specifically, the general wizard steps are:
- Provider Account: the OCCI endpoints of the providers where deploy the elastic cluster.
- OCCI endpoints serving the vo.access.egi.eu VO are dynamically retrieved from the EGI Application DataBase using REST APIs
- Operating System: the OS of the cluster, by using a select box where the most common OS are available or by indicating a valid AMI/VMI identifier for the Cloud selected.
- Instance details: the user must indicate the instance details.
- LRMS Selection: the user can choose the Local Resource Management System preferred to be automatically installed and configured by EC3. Currently, SLURM, Torque, Sun Grid Engine and Mesos are supported.
- Software Packages: a set of common software packages is available to be installed in the cluster, such as Docker Engine, Spark, Galaxy, OpenVPN, BLCR, GNUPlot, Tomcat or Octave. EC3 can install and configure them automatically in the contextualization process. If the user needs another software to be installed in his cluster, a new Ansible recipe can be developed and added to EC3 by using the CLI interface.
- Cluster size: the maximum number of node of the cluster, without including the front-end. This value indicates the maximum number of working nodes that the cluster can scale. Remember that, initially the cluster only is created with the front-end, and the nodes are powered on on-demand.
- Resume and Launch: a summary of the chosen configuration of the cluster is showed to the user at the last step of the wizard, and the deployment process can start by clicking the Submit button.
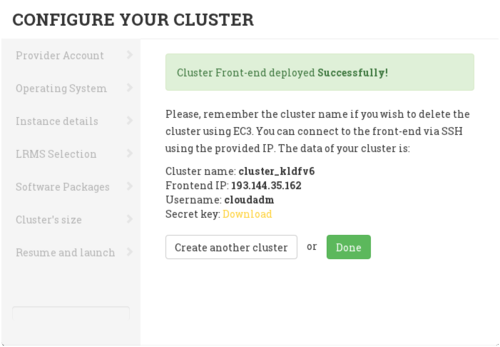
When the front-end node of the cluster has been successfully deployed, the user will be notified with the credentials to access via SSH.
The configuration of the cluster may take some time. Please wait its completion before to start using the cluster.
Accessing the cluster
With the credentials provided by the EC3 portal it is possible to access to the front-end of the elastic cluster.
[larocca@aktarus EC3]$ ssh -i key.pem cloudadm@<YOUR_CLUSTER_IP>
Welcome to Ubuntu 14.04.4 LTS (GNU/Linux 3.13.0-77-generic x86_64)

 * Documentation:  https://help.ubuntu.com/
New release '16.04.1 LTS' available.
Run 'do-release-upgrade' to upgrade to it.

Last login: Thu Oct  6 10:53:13 2016 from servproject.i3m.upv.es
$ sudo su -
root@im-userimage:~#
The configuration of the front-end is done with ansible. This process usually takes some time before to finish. User can monitor the status of the configuration of the front-end node by checking the presence of some ansible processes:
root@torqueserver:~# ps auxwww | grep -i ansible
cloudadm  3907  1.5  0.5 160044 20576 ?        S    10:56   0:00 python_ansible /tmp/.im/92940c6c-8ba1-11e6-a466-300000000002//ctxt_agent.py /tmp/.im/92940c6c-8ba1-11e6-a466-300000000002//general_info.cfg /tmp/.im/92940c6c-8ba1-11e6-a466-300000000002/<YOUR_CLUSTER_IP>/config.cfg
cloudadm  3933  4.3  0.6 174640 27256 ?        S    10:56   0:01 python_ansible /tmp/.im/92940c6c-8ba1-11e6-a466-300000000002//ctxt_agent.py /tmp/.im/92940c6c-8ba1-11e6-a466-300000000002//general_info.cfg /tmp/.im/92940c6c-8ba1-11e6-a466-300000000002/<YOUR_CLUSTER_IP>/config.cfg
cloudadm  4038 18.5  0.6 174488 26032 ?        Sl   10:56   0:04 python_ansible /tmp/.im/92940c6c-8ba1-11e6-a466-300000000002//ctxt_agent.py /tmp/.im/92940c6c-8ba1-11e6-a466-300000000002//general_info.cfg /tmp/.im/92940c6c-8ba1-11e6-a466-300000000002/<YOUR_CLUSTER_IP>/config.cfg
cloudadm  4115  1.3  0.7 184412 28636 ?        S    10:56   0:00 python_ansible /tmp/.im/92940c6c-8ba1-11e6-a466-300000000002//ctxt_agent.py /tmp/.im/92940c6c-8ba1-11e6-a466-300000000002//general_info.cfg /tmp/.im/92940c6c-8ba1-11e6-a466-300000000002/<YOUR_CLUSTER_IP>/config.cfg
root      4121  6.2  2.0 140904 82060 ?        S    10:56   0:01 /usr/bin/python /tmp/ansible_gSR3wi/ansible_module_apt.py
root      4328  0.0  0.0  11744   952 pts/0    S+   10:56   0:00 grep --color=auto -i ansible
and using the is_cluster_ready command-line-tool:
root@torqueserver:~# is_cluster_ready
Cluster is still configuring.
When the command returns the following message:
root@torqueserver:~# is_cluster_ready
Cluster configured!
The front-end node is successfully configured and ready to be used.
root@torqueserver:~# pbsnodes -a
vnode1
     state = down
     np = 1
     ntype = cluster

vnode2
     state = down
     np = 1
     ntype = cluster

vnode3
     state = down
     np = 1
     ntype = cluster


root@torqueserver:~# qstat -q

server: torqueserver

Queue            Memory CPU Time Walltime Node  Run Que Lm  State
---------------- ------ -------- -------- ----  --- --- --  -----
batch              --      --       --      --    0   0 --   E R
                                               ----- -----
                                                   0     0

root@im-userimage:~# clues status
node                          state    enabled   time stable   (cpu,mem) used   (cpu,mem) total
-----------------------------------------------------------------------------------------------
vnode1                          off    enabled     00h30'48"      0,0              1,-1
vnode2                          off    enabled     00h30'48"      0,0              1,-1
vnode3                          off    enabled     00h30'48"      0,0              1,-1
The Galaxy web-based platform for data-intensive research is usually running on port 8080. You can check if there is any service listening on this port using the nmap command:
root@torqueserver:~# netstat -ntap
Active Internet connections (servers and established)
Proto Recv-Q Send-Q Local Address           Foreign Address         State       PID/Program name
tcp        0      0 0.0.0.0:22              0.0.0.0:*               LISTEN      1179/sshd
tcp        0      0 0.0.0.0:15001           0.0.0.0:*               LISTEN      2065/pbs_server
tcp        0      0 0.0.0.0:15004           0.0.0.0:*               LISTEN      3875/maui
tcp        0      0 0.0.0.0:42559           0.0.0.0:*               LISTEN      3875/maui
tcp        0      0 127.0.0.1:8000          0.0.0.0:*               LISTEN      4617/python
tcp        0      0 0.0.0.0:42560           0.0.0.0:*               LISTEN      3875/maui
tcp        0      0 0.0.0.0:8800            0.0.0.0:*               LISTEN      10880/python
tcp        0      0 0.0.0.0:8899            0.0.0.0:*               LISTEN      10880/python
tcp        0      0 <YOUR_CLUSTER_IP>:15001 <YOUR_CLUSTER_IP>:58556     TIME_WAIT   -
tcp        0      0 <YOUR_CLUSTER_IP>:15001 <YOUR_CLUSTER_IP>:58548     TIME_WAIT   -
tcp        0      0 <YOUR_CLUSTER_IP>:15001 <YOUR_CLUSTER_IP>:58532     TIME_WAIT   -
[..]
Accessing the Galaxy portal
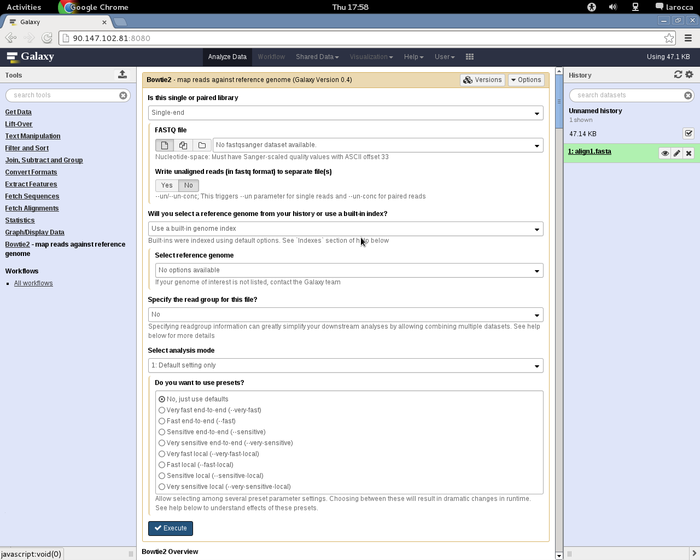
To access the Galaxy portal, open the browser at this URL http://<YOUR_CLUSTER_IP>:8080 as shown in figure:
First step is to create an account to get admin rights to access the Galaxy portal.
In the top bar menu, navigate the "User" menu and click on "Register" to create a new account.
Default e-mail address, for the admin account is, admin@admin.com.
Set a password and chose as public name "galaxy".
Install bowties2 in the Galaxy Portal
In this sub-section we will show how to configure the Galaxy portal to use bowties2. Other components/tools can be configured using the same web interface and procedure described hereafter.
In order to setup bowtie2 correctly, two components are necessary:
- the bowtie2 tool (with its dependencies) and,
- the reference data files.
The bowtie2 tool can be installed through the Galaxy Toolshed.
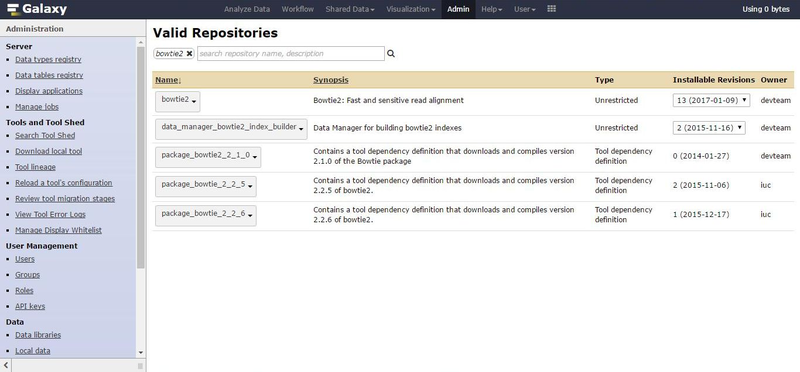
On the admin webpage, clink on the "Search Tool Shed" option, select the "Galaxy Main Tool Shed" and search for "bowtie2".
Installing missing dependencies
Before the installation of the bowite2 tool (first row in the result), we need to first install the dependencies.
We are going to use the latest version currently available in this interface:
- package_bowtie_2_2_6 provided by iuc (last row in the results),
- the NCurses (v.5.9) packages,
- the Zlib (v1.2.8) package and,
- the SAMtools (v1.2) packages.
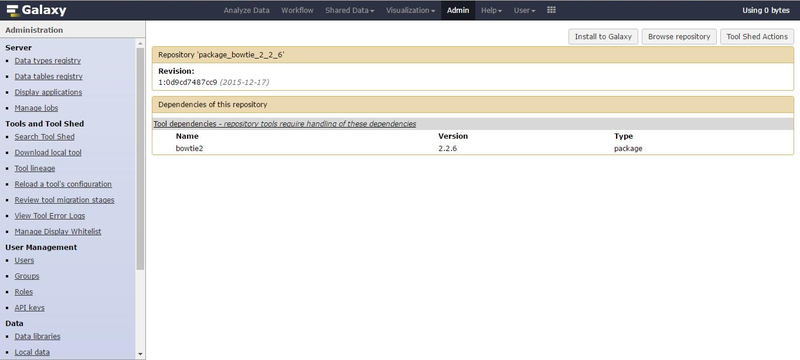
Click on the tool name for "Preview and Install" which leads to the next page.
Click on "Install to Galaxy" for the next screen and finally click on Install to setup the tool dependency package.
We are going to repeat the same process to install the rest of the dependencies.
- From the Admin page => "Search Tool Shed" => "Galaxy Main Tool Shed" and search for NCurses.
- We must select the correct version, i.e. package_ncurses_5_9 provided by iuc.
- From the Admin page => "Search Tool Shed" => "Galaxy Main Tool Shed" and search for Zlib.
- We must select the correct version, i.e. package_zlib_1_2_8 provided by iuc.
- From the Admin page => "Search Tool Shed" => "Galaxy Main Tool Shed" and search for SAMtools.
- We must select the correct version, i.e. package_samtools_1_2 provided by iuc.
- The selection of the dependency packages in turn implies that we need to install the version (i.e.) of bowtie2 closest to the dependencies.
- Again, from the Admin page => "Search Tool Shed" => "Galaxy Main Tool Shed" and search for bowtie2.
- By looking through the Installable Revisions, we can see that the optimal revision is #9 (18 Nov 2015).
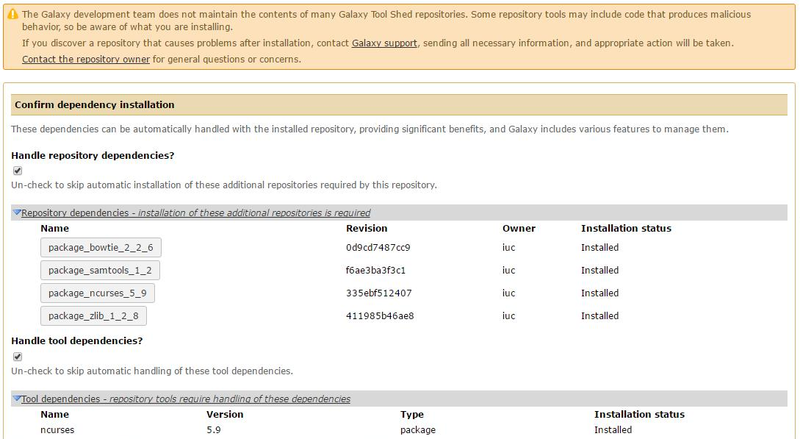
- Clicking on this revision, we can now see the dependencies of the tool.
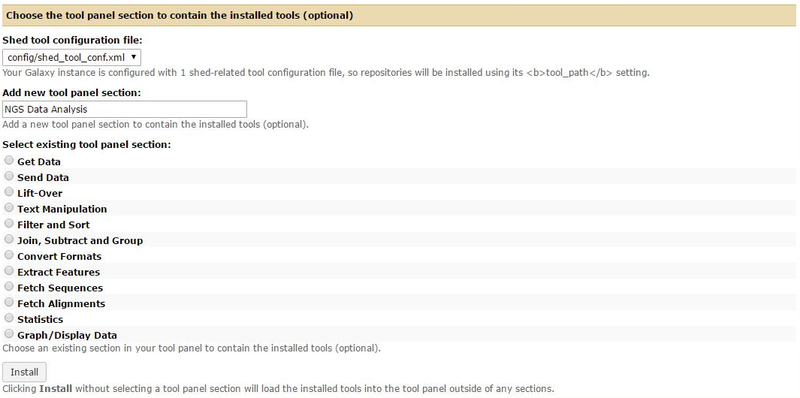
After clicking on "Install to Galaxy", we are led to a slightly different page than before, due to the fact that we are now adding a new tool for the user and not a dependency. This means that there will be a new entry for the user to click on and we can (if we want) create a new section for the tool (let’s call in "NGS Data Analysis"). Beyond that, we can see that all dependencies are already and correctly installed.
Click on <Install> to setup the tool.
Install Reference Data in the Galaxy Portal
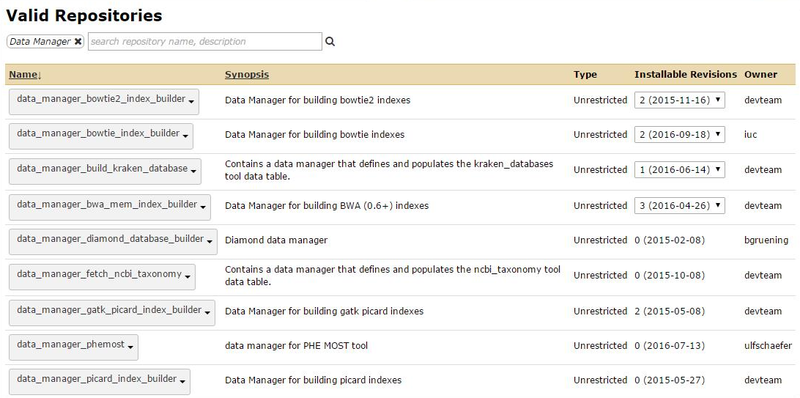
Now the tools has been successfully installed but, before to use it, we must also add the reference data. For this purpose, we are going to use one of the provided Data Managers and in particular the RSync Data Manager.
From the Admin page => "Search Tool Shed" => "Galaxy Main Tool Shed" and search for Data Manager. We will select the RSync G2 version.
Installation process is the same: click on the package name => "Preview and Install" => "Install to Galaxy" => "Install".
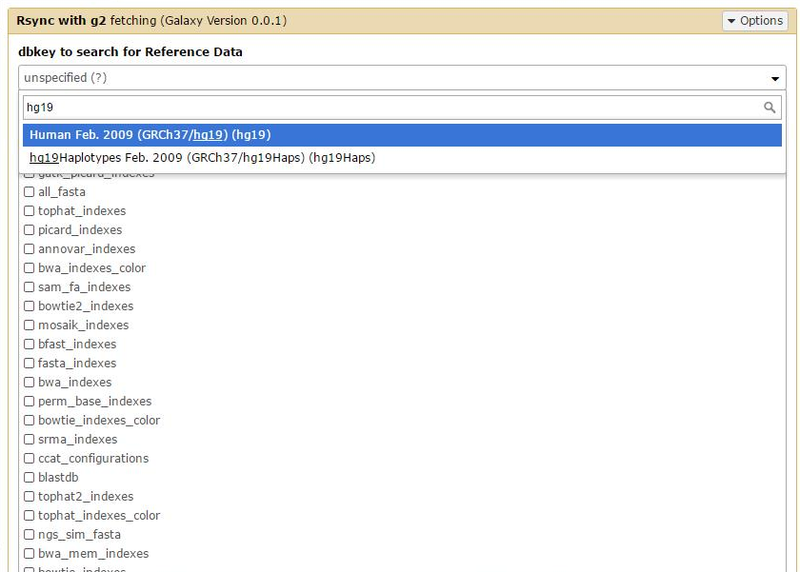
Now we can go through the Admin page => Local Data => Rsync with g2 - fetching (under the "Run Data Manager Tools" heading) and select "hg19" from the dbkey.
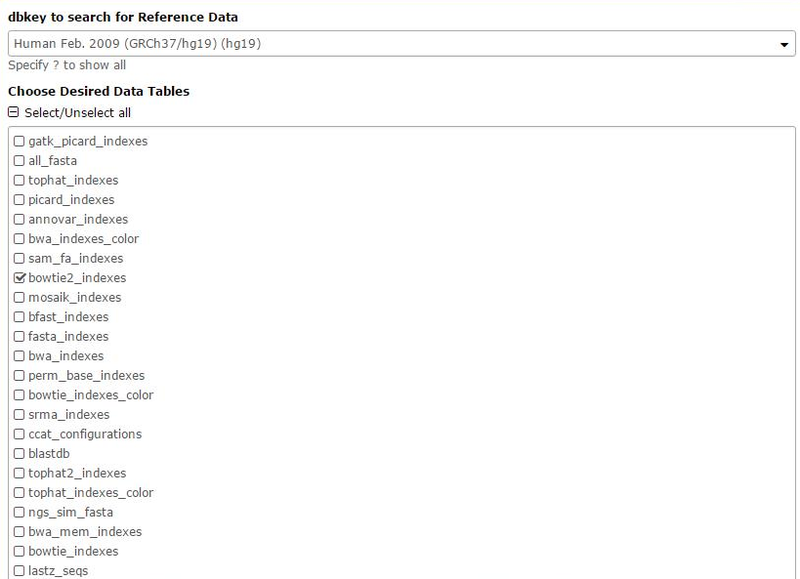
Then select the bowtie2_indeces for the Desired Data Tables
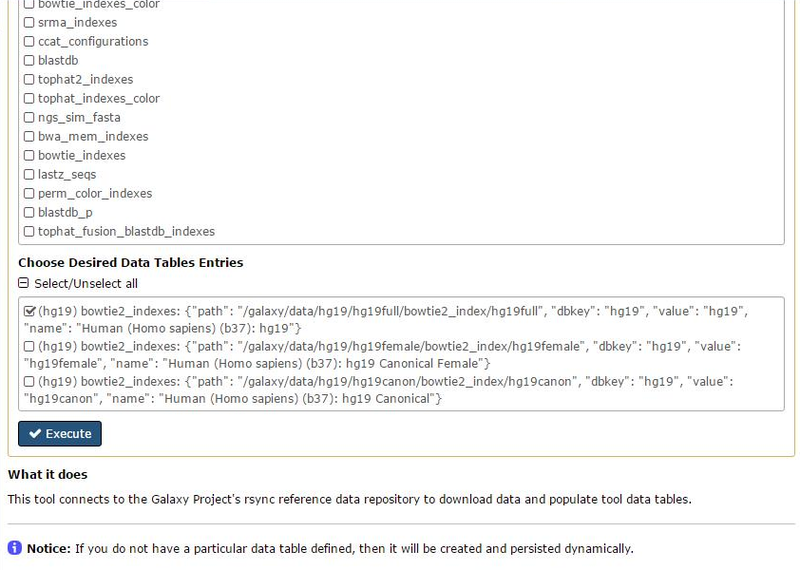
and finally the hg19full for the Data Table Entry query.
Clicking on Execute we have a message telling us that the job is running...
We can now monitor the job through the Admin page => Local Data => Rsync with g2 - fetching (under the View Data Management Jobs header).
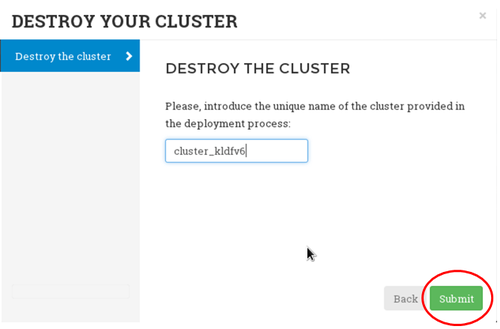
Destroy a cluster
To destroy a running cluster, click on the "Delete your cluster" button and provide the clusterID
